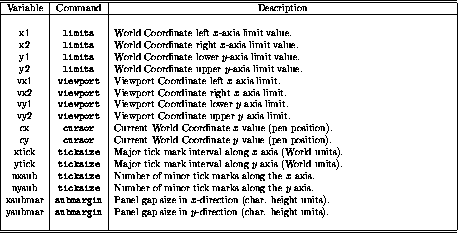
Table 8.1: User Variables -- Coordinate Systems


Available to the WIP user are a host of variables. Many of these variables are associated with the general graphical attributes discussed in Chapter 3; some with the current image (Section 5); and some are available to perform simple to complex calculations. Whenever the user accesses a graphics tool in WIP, they are probably setting the value of an internal variable. In general, these variables need not (and should not) be accessed directly. These variables may, however, be used to probe the current values and may also be used as arguments to their respective commands. Some of the variables, however, can only be accessed directly and are designed for that use. The sections that follow will describe the variables that are currently available to the user (Section 8.2) and the tools used to access them (Section 8.3). In addition, there are ways the user can create and destroy their own user variables (Section 8.4).
User variables enable the WIP user to perform quite complicated tasks easily. In addition, it allows the user to perform commands without knowledge of the actual current value of the user variable. For example, as will be shown in Section 8.2, the user variables that specify the limits of the current world (or User coordinate) window are x1, x2, y1, and y2. Suppose an astronomer reads in a list of x and y values that correspond to right ascension and declination positions, respectively. If the limits are determined automatically with the limits command (i.e. the command called with no arguments), then the x axis values will increase to the right. But right ascension increases to the left. The following WIP listing shows how, with the use of user variables, this can be corrected...without knowing the actual values of x1, x2, y1, and y2:
This works because WIP\ checks for arguments and expects literal numeric values whenever it is passed a command. If WIP cannot ``understand'' the argument as a number it searches the list of user variables for a match. If a match is made, the current value of the user variable is substituted internally for the corresponding command argument.
There are two types of user variables available: numeric variables and string variables. These two types cannot be mixed at any time! Attempting to mix these types of user variables will either create an error message or produce unpredictable and undesirable results.
Tables 8.1 -- 8.3 identify the current predefined numeric user variable names, a description, and a (typical) command which may be used to set it (the index at the end of the manual will direct the reader to a more detailed description of each of the commands mentioned as well as possibly a few more that are applicable). The tables are broken up into areas where the user variable is most applicable.

Table 8.1: User Variables -- Coordinate Systems
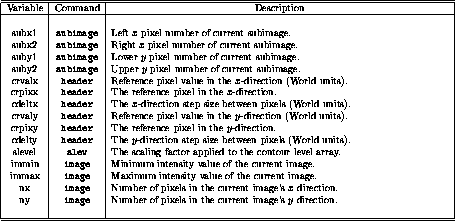
Table 8.2: User Variables -- Images

Table 8.3: User Variables -- Graphical Attributes
In addition,
Table 8.4
identifies the current predefined numeric user variable array (vector) names,
the maximum defined size of the array, and the typical commands used to load
the array.
Some of these entries have the maximum size set by the user variable
maxarray .
This is initialized to 20,000 by WIP but may be overridden by setting
it to a larger or smaller number.
This must, however, be done right when WIP starts.
The best way to insure this is done correctly is to specify a different
value in the user's .wipinit file
(see Appendix A for further details).
For example, to set this value to 10,000, the following command would be
put in the user's .wipinit file:
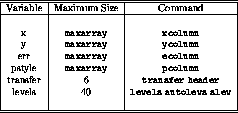
Table 8.4: User Variables -- Numeric Arrays
The string user variables may be fewer in number but are just as powerful as the numeric user variables. The current pre-defined string user variables are listed in Table 8.5 along with the primary command used to set each, a description of each variable, and the corresponding default string value.
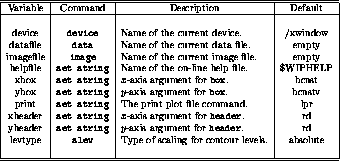
Table 8.5: String User Variables
This section describes the WIP commands that access and change the value of the user variables. Remember that there are two types of user variables: numeric and string. The primary command used to access all User Variables is set . In addition, another command used to set the string variables is called string . The command echo can be used to display the value of many of the user variables (both numeric and string) on the command line. Also of use is the show command. The show command presents many of the user variables along with their current values. The user variables are listed by show in upper case along with their current value.
The command set requires at least two arguments. The first (required) argument is an acceptable user variable name. This may be any predefined user variable (see Tables 8.1 -- Table 8.5) or any user variable defined with the new command (see below). The remaining arguments are treated differently depending on the type of user variable being set. The next two sections discuss how set treats (i) numeric and variable array (vector) user variables and (ii) string user variables.
When evaluating numeric user variables (both simple numeric and vector), the first argument will be set to the result of the expression consisting of the tokens appearing in the rest of the command. The expression is used to determine what value will be assigned to the user variable. The syntax of the set command expression in this case is just a standard mathematical expression with the following exceptions:
The most straightforward use is to set the user variable equal to something. For example (and note the absence of the = sign),
Table 8.6 identifies the operations that act on two variables. These operators allow user variables to be added, subtracted, and so on. They also allow two user variables (or expressions) to be compared with the validity of the comparison as the result. As mentioned already, there is no precedence of the various operators except that of being evaluated from left to right. This may be explicitly specified by enclosing various operations within a matching pair of parentheses.
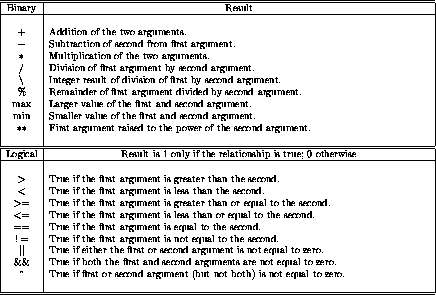
Table 8.6: Double Variable Operations
Note that the logical operations will only return a value of 1 if the expression evaluated is true or a value of 0 if it is false. Only these two values are returned regardless of the value of the two arguments used to test the conditional.
Table 8.7 lists functions that operate on single variables. Functions are identified by WIP when it sees a recognized function name followed by parenthesis which enclose the variable. The argument within the parenthesis is evaluated and then passed to the function. Hence, the expression within the parenthesis may be any valid expression (even another function) as long as it evaluates to a single variable. Note that functions appearing in the top part of Table 8.7 require a numeric value as the argument to the function and functions listed in the bottom part require a vector name.
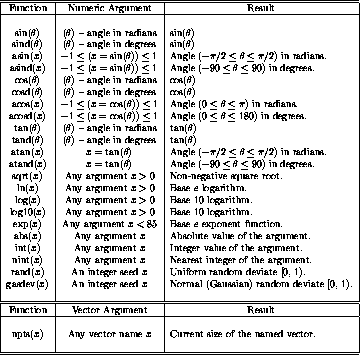
Table 8.7: Single Variable Functions
One note about two of the functions listed in Table 8.7. The functions rand(x) and gasdev(x) use a negative integer argument to help seed the random number generator functions. By default, a seed is pre-supplied by WIP. Hence, the user only needs to supply an argument of zero each time one of these functions is called. If the user wishes to start with a different seed value, then the first time one of these functions is called, the user should supply an odd, negative integer value. On subsequent calls, the user should still supply a value of zero. This is because the seed is retained internally and it is used if any positive argument is passed to the function.
Note that an argument in the expression of the set syntax can be easily made negative by placing the minus sign before the user variable name. For example, the commands
When the user variable is a string variable, the first argument to set is the string variable name and the remaining arguments are treated as a string to be assigned to that variable. This is the easiest way to set a string variable. For example,
The syntax of the set
command is such that it requires at least
one argument: the string variable name.
If no other arguments are present,
the string variable is set to an empty string.
If other arguments are present, then the remaining arguments are
copied, exactly as entered, into the string variable.
Hence, string variables may contain several tokens (words) in its
translation.
The string variables in Table 8.5
not directly associated with the
set command (device, datafile, imagefile, etc.)
are set by the listed commands and generally should not be changed with
the set command.
The other string variables listed in Table 8.5
are specifically designed to be accessed by the user
to allow WIP to be customized according to their needs.
The set command changes the value of the variable until either
the end of the plotting session, until another set command,
or until it is reset by a command.
Additionally, set commands may be placed in the user's
.wipinit file (see Appendix A for more
details) to always override WIP's initial values.
The string command is another method used to set string user variables. The string command allows the user to set the string variable using the contents of an external file. Only one line is read by the command but the user may specify which words of that line are actually loaded into the string variable. This command, along with its arguments, is discussed further in Section 3.7 and Appendix D.
New user variables may easily be defined with the
new
command.
Likewise, the user defined variables may be removed with the
free
command.
The ability to define user variables allows the user
to create local variables in macros,
retrieve and assign image header variables,
and associate a value with a variable name more in keeping with its use.
The only limitation on user defined user variables is that they may not
have the same name as any other user variable, vector, string variable,
or function.
As an example of local usage of user variables, consider the following macro:
The user should be aware, however, that defining user variables is a
global operation.
Just because a variable is defined within a macro does not mean that
it is only seen by that macro or is active only while in that macro.
On the contrary, user defined variables exist in same way as predefined
user variables and do so until they are removed.
For this reason, care is needed when defining local variables.
In the example above,
another macro could define these same variables and then call the macro
radec.
This would cause the macro radec to abort when
the new command is reached.
Therefore, make sure your local names are ``really'' local (i.e. unique).


